Saturday, 16 April 2011

Toolkit epiphany

Tomorrow, I'll be on the market again. As I didn't have a sale last time, I had no real need to produce more. However, I prepared masses of bamboo struts, mainly thought for octahedra. I used one tendon per strut successfully for spherical models (24 or more struts), yet used a variety of tendon strategies in smaller models.

In a Class 1 tensegrity, the tendons connect to a continuous network. Ideally, a structure deploys (at least) three separate tendons from each 'knot' to a compression member. A six-strut icosahedron would need 24 tendons, yet a continuos tendon can shape one as well (but that's another story...).

A six-strut tetrahedron still has 18 tendons, which means a 3:1 ratio of tendons to strut (at least three tendons, 18 must be the smaller number of connections between 12 points). I struggled a lot building those, using 4 triangular loops and 6 tendons. Maximising tendons proved well for large structures with few compression elements, but smaller models can be build more economical.

Tensegrities derived from regular geometrical shapes 'cut' the corners off, with as many struts joining as the number of edges joining in a corner. Three edges join the corner of a tetrahedron, hence the corner is opened into a triangle. Having the four corners equally sized balances the structure well, and, to simplify matters more, only six tendons remain for final tuning of the model.

Using 10 instead of 18 hypothetical tendons make life already easier, but somehow I insisted to complicate my tensegrity build experiments more than necessary so far. Besides the x-module, the tensul and the six-strut icosahedron, all symmetrical shapes I encountered only need one tendon per strut, weaving another to either end to complete three tendons per joint.

Toolkit variation with 6, 9 and 12 struts

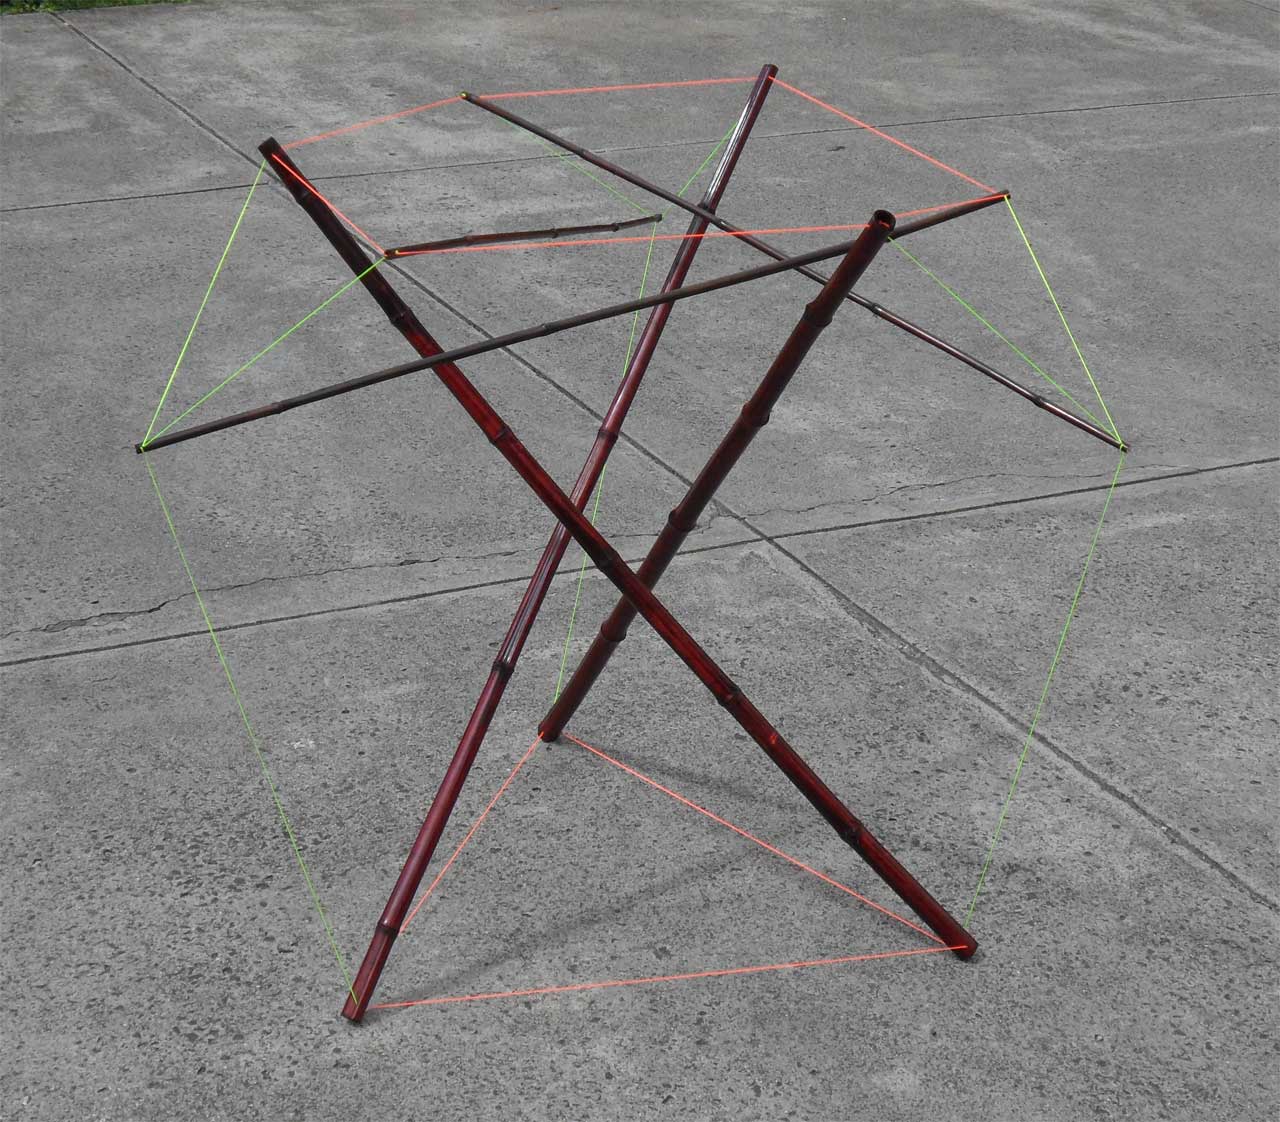
After revisiting the java app at xozzox I wanted to test the versatility of a single elastic tendon per strut approach by building a 'trigonal dipyramid'. Basically, it's a 3-stage tensul tower, yet with fewer connections than I build in larger scale so far. It has 5 corners, 2 triangular and 3 squared, and squishes down nicely when pushed along the triangular corners.

I went to build the trigonal prism using similar components, and finished much faster than the still quite laborious first go. Can I really build all platonic solids (tetrahedron, cube, octahedron, icosahedron and dodecahedron) with the simple one tendon per strut strategy?

One approach to convert a platonic solid into a tensegrity structure transforms each edge into a compression element, and the corners into tension loops. Following this definition, I already made an icosahedron and a dodecahedron, using one tendon for each of the thirty struts required. (The six strut icosahedron connects two of its twelve corners, using a 'shortcut' through the centre of the structure)

After studying some of my tetrahedral models I concluded that it can be done, and again got stunned by the simplicity of the process. Once I figured out the 'weaving' pattern, I just needed some trust in the stability of these structures, and everything came together easily.

Building a cube and an octahedron as final proof of concept happened after some side explorations. I used physical models as template, and re-used the components of prior experiments.

Toolkit top view
Above you see 48 identical struts, connected with 48 tendons, comprising five different structures with a maximum of twelve and a minimum of six compression elements. You need 24 struts for a vector equilibrium, 30 for icosahedron and dodecahedron, 90 for a Fullerene.

When I did the last bit of prototyping, I used the same measures as for structures with more compression elements. I doubt it would hold up spheres with more than 48 struts, yet it works great for the platonic solids, combinations thereof, and seemingly many other composite structures. Assembling any of the above models (even with some additional stability measures and tuning) took much less than 30 minutes.

Using single tendons can confuse easily, but following simple rules and pattern make it easy to build all platonic solids with just 30 identical elements. The elastic cord offers enough tension for quite a high number of elements (towers still tend to be floppy), and hooking/unhooking the tendons took little effort. The models end up in a size desktop suitable, I have to see how the market reacts tomorrow.

Thursday, 14 April 2011

Frog in the well

Frog in the well
I went to the local hardware store to find a small table saw. It could make preparing wooden struts much faster and even more precise than the Dremel, but I'll have to wait to find out. Instead, I brought a 3m aluminium tube home and got busy.

The first hole I drilled was too wide to hold a knotted nylon string, yet I decided to worry about this fact later and prepared three alu struts for a prism, each with three equidistant holes about 2cm from the end. Doubling the tendon should provide additional strength, and a knot of two strings of nylon held safely in the hole.

I used the measures taking from a bamboo strut structure with nearly 1m struts. I adjusted the final tension by pulling the vertical tendons overly tight, and then knotting off between 2 and 5 cm of it. I ended up with the box shape I wanted, with decent tautness. I did a stress test by putting a zabuton on top, and it took the load nicely.

I pushed the end of the strings back, and riveted the end of the tubes. The construction details hidden, not perfectly but nicely balanced, evenly spaced holes made it a satisfying piece by itself. Yet it invited me to do more, to use it as base for a more complex tensegrity.

After installing two bamboo tensuls into the top triangle, and playing around with spheres on top of them, I build a 30-strut icosahedron with nylon strings. I chose a strut length I didn't use before, and estimated the string length required, with nasty consequences. The overall tension split one after another strut, as could drops from just one meter height.

The drop resistance might not have improved, yet in its current installation the structure is unlikely to be exposed to excess stresses. The sphere now rests on a single smaller tensul, with a 3:1 ratio of strut length from basis to middle part, and a 3:1 ratio of strut length and upper triangle of the support for the sphere.

Instead of a tension triangle, the base of the support prism get its tension from three connected nylon string loops, connected to the lower end of the struts. A small Chinese bell with a frog sitting on it is suspended from the center.


Now all I need are three columns to elevate the model some more. The aluminium struts were easier to work with than I thought, and invite bigger structures.

Sunday, 10 April 2011

Class 2 tetrahedron

Tensegrity structures still wait for more popularity. While my fellow market traders got used to them, and spend some time playing with them, it's still rather one in hundred passers-by that identifies my work as tensegrity.

I shied away from investigating tensegrity theory since I started building sculptures, but I renewed my research lately with some surprising findings. I realised that I reinvented the wheel - the Unholy Grail uses the structure of Bob Burkhard's Wheel 2. When I browsed Bob's great site again I stumbled upon a Class 2 tensegrity tetrahedron.

I still have some models using eyebolts available for recycling, so I considered rebuilding a tensegrity structure with joints. I threaded the eyebolts of two struts together, which creates a multi-directional joint. A class 1 tetrahedral tensegrity needs 6 struts, and a bit of imagination to detect the tetrahedral shape. The hinged class 2 tetrahedron only requires 4 struts, and seven tendons.

I had no idea about the precise tendon length, nor how the joints would affect the build process. I started with elastic tendons for the edges, and a fixed tendon between the joints. The nightmare began. I hoped that the elastic cord would allow me to 'stretch' the model into a stable position, but the jointed struts kept turning and unhinging some outer tendons. The mobility of my improvised joints backfired, and after some variations of central tendon length, outer tendon length and order of attaching outer tendons I gave up.

Unlike many nicely rendered tensegrity structures one can find on the web, Bob Burkhard showed two photos of actual models showing this class 2 tensegrity. Knowing for sure that this idea can be build, using quite familiar connection types, I reflected on my difficulties during the failed attempts and devised a new strategy.

I used nylon cords with little bowline knots at either end - this should limit slippage of the outer tendons, and give equal length. Even with fewer components than most class 1 models, this build remained challenging. At first, I used a metal hook as connection between joints, with little luck. Then I limited the mobility of the joints by tying elastic cord around it several times, replacing the hook as central tendon.

After several attempts all outer tendons got connected, and shaped a tetrahedron. I didn't let go of the struts, the model didn't feel self-sustaining yet. The elastic cord made it easy to shorten the central tendon, and gave the model stability. It still collapsed, and sometimes outer tendons became loose when I played with it. It still takes me patience to pop it back into a stable 3d state after a collapse. I closed the eyebolts, so that the tendons stay in place.

The final result stunned me. The outer tendons clearly delineate a tetrahedron, and two pairs of joined struts, held together by a short central tendon, connect the corners to its central area. The joined struts give the model optically more substance, and the behaviour provided pure fun. The model balances on a triangular face, so one strut always points up. If you push back this strut, the tendon connecting it to its joint member slacks off. Once you release it, it springs forward, easily with enough momentum to tilt the model over.


If I use joints again, I make sure I use a hinge joint for the tetrahedron. Two joined eyebolts offer too much freedom of movement, which might contribute to a collapse as well. The structure feels different from most class 1 tensegrities I build, and show a surprising dynamic movement under little external stress.

Thursday, 24 March 2011

Windspiel

Tensul tower with wind chime and dodecahedron
While I seem far away to build a sculpture with musically tuned tendons, I simply used an older idea move to transform little movement into sound: a wind chime. I suspended one of those from the top corners of a two-stage tensul tower, so that it has room to swing around. Just for show, I connect a large dodecahedron into the top triangle. Impulses travel now very unpredictable through the structure. It still needs anchoring for outdoor use, as you see in the video.


The dodecahedron came lose after the sculpture toppled the first time, I used it as reference for the wind speed. Shortly I kicked it back to rest next to the tower, a gust came. It looks like the weight of the wind chime pulled the structure over. I'm still surprised how easy the wind blows over tensegrity towers, as they offer only little surface area. If only I had some outdoor space for longer lasting experiments with stability in wind and weather....

Monday, 21 March 2011

Unholy grail

Although I'm slowly running out of space, I can't stop myself from building more sculptures. Especially as I started to produce bigger pieces. Tensegrity structures scale in surprising ways - it gets easier to build them when you go bigger.

I haven't seen any other class 1 tensegrity with 48 sticks based on an octahedron, and felt glad about the photos I took from my first attempt for a rebuild. Unlike its little brother with 12 sticks, you can use two colours in a symmetrical fashion throughout the structure. Spherical class 1 tensegrities with more than 20 sticks seem to require a minimal length for the struts to bear their own weight. The first 48 stick octahedron only remained without touching struts when it was hanging, its own weight collapsed the corner square it rested on. Time to get bigger.

Using many sticks for a single structure means preparing lots of identical elements before the build can begin. Colour-coding the different elements made my life easier, and helped me to detect a pattern in the 48 stick octahedron that made building easy. Like in the 12 stick version, four sticks meet in a loop where the original corners were. Additionally, three looped sticks represent the original face of the octahedron. Six corners, made of four sticks, equals 24, eight faces, made of three sticks, equals 24.
 Corner square clockwise

Triangular face counter-clockwise
I build the 30 and 90 stick spheres (based on the icosahedron) stick by stick, from bottom to top in a concentric fashion. The 48 stick octa invited me to a more modular build, the triangles and squares joined but didn't have struts in common.
8 triangulated faces and 6 squared corners 
I coloured one side of the square struts to have the coloured side facing outwards in the triangles, and inside in the squares. The squares turn clockwise, the triangles counterclockwise. The square loop connects the 'short' end of the struts, the triangular loop joins the 'long' ends. I guestimated the points of connection and started off building the 14 modules. Assembling the octa from the modules came easy, I only got lost once but found my mistake fast.
One corner module joined with 4 face modules

The final model surprised and disappointed me. It looked rather cubical than spherical, unlike the smaller first version the corners kept 'open'. Well, to a certain degree. I when I started tuning the model to balance on all corners I went through to various stages of behaviour of the model. The structure would balance on some corners, balance after collapse, not balance with or without collapsing corner.
Model before assembling the final corner module
I decided to wait to transform my disappointment about behaviour and looks until the next day. Then, I explored the random behaviour with more tweaking around. By replacing the triangles with smaller ones I could potentially remedy two things in one step. And it did. The structure now balances on at least three of its corners, and only collapsed under additional load.

* * *

As I replaced 8 triangular modules from the octahedron, I thought initially about building another octa with them. Instead, I started playing with them by joining 6 of them into a flat hexagon. One strut of each triangle went perpendicular to hexagon corner it was joined to, so I bring some tension into the model by looping these six struts together. Voila, an 18 stick class 1 tensegrity made in a jiffy.

The structure reminded me of a fence, or a yurt. I took another triangular module to build a roof and stabilise against warping along the hexagonal baseline. Now I had something tent-like, or a sort of bowl when turned around. The 'roof' triangle collapsed the sticks in it when placed on it, so I played with adjusting the roof triangle size and tension.

Even thin air made my bottomless bowl collapse, so I used another tensul, this time rotating in the opposite direction, to get more stability. The big tensul on top removes the resemblance of the yurt, yet when turned around it all of sudden looks a bit like an ancient cup. The bowl and handle use different colours, nylon cords indicate the 'rim' and connection between handle and bowl.

The structure can even take some light loads, and deforms visibly without losing balance. Another tensegrity I haven't even dreamt of before that opened many cans of worms worth exploring. I'm still not sure whether to call this structure 'Holy grail' or 'Unholy grail'. It opened some new avenues to explore modular building that might even upscale easily.

* * *

Reading about tensegrity contributed lots to my recent explorations. I had no idea how to deal with or implement joints in a tensegrity structure, or whether this would void somehow the 'true tensegrity paradigm'. According to Fuller, everything is a tensegrity structure, according to Snelson its rather structures where 'islands of compression float in a sea of tension'. Skelton and Oliveira came up with a classification of tensegrity structures that even helps applying this idea to the musculo-skeletal system.

Without compression elements articulating in a common joint, Skelton and Oliveira speak of a Class 1 tensegrity systems. If 2 'sticks' meet, it's a Class 2 tensegrity, and so on. As long as tension is required for the stability of the system, it still deserves consideration as tensegrity.

I had still some struts with eyelids at each end lying around, and two eyelids connected make up a simple joint. While connecting strings to eyelids poses sometimes a challenge, hooking them into a model under tension works smoothly. I wanted to explore suspending small tensegrities from bigger ones, and struts with eyelids nicely suit this purpose.

Viewed from the top, the strings of a tensegrity tetrahedron balanced on a corner look hexagonal. I suspended an octahedron from three sides of a large tetra, the suspended structure floats upright above its support. In this case, the octahedron can be collapsed and reacts sensitively to any movement of the larger support.

'Timeless Hourglass' deploys already suspension, strings leading to the centre of the top triangle. It's large enough to experiment with hanging eyelid sticks from its top triangle. At the moment, a dodecahedron hangs about 80 cm below the top, in the lower half of the hourglass. The connection consists of two 40cm sticks joined with eyelids, acting as joints. Technically, this is now a class 2 tensegrity system.

The joints add an interesting dimension to the behaviour. With lots of movement, the joints act as a dampener, similar to systems for earthquake save sky scrapers. Each moves differently The dodecahedron pendulum retains movement for a long time, though, and slightest currents start moving it.

Suspension brings together the three different joining styles I explored so far: knots held by a hole in a tube, knots held by a groove, strings hooked into an eyelid. It combines as well the different materials: hollow bamboo, short diameter bamboo, oak struts, nylon and elastic cord.

Wednesday, 9 March 2011

How to build a tensegrity octahedron

Besides icosahedra, octahedra can be build to collapse and bounce back. If you use just elastic cords, the model has high mobility, yet I noticed that the cords slide sometimes to easy around in models with just elastic cord. I use elastics for the six 'corner' loops, and nylon for the remaining twelve tendons. 

The less stretchy nylon helps to maintain the overall shape after a collapse. The different materials indicate their function in a 'solid' octahedron: The edges turned into the nylon cords, the corners folded open into a square loop made of elastic cord. 

The nylon cord has a length of 7cm between the knots (made from 10cm cuts), the elastic cord has a length of 30cm tied to a loop. As I loop the the elastic cord around the grooves to secure their position, the effective length between struts comes down to 6cm. The struts itself measure 16cm, with 15 cm between attachment points.
Components for the model

I aim for precision when I prepare the components for a model, yet symmetrical models can do with a bit of variation in length. With a lot of a variation in tendon or strut length, the model looks less symmetrical, it still works as tensegrity system. 

So it starts from 12 struts (15cm effective compression), 6 loops made from elastic cord, 12 tendons made from nylon. The four 'horizontal' edges will be yellow, the eight vertical ones will be orange. Different colours for different functional elements make it easier to keep organised while the model is still two-dimensional.
Step 1: Attaching the tendons

In the finished model, each strut is connected to two tendons and member of two 'corner loops'. To prevent the tendons from slipping out, they get attached first. Four struts get a 'vertical' and 'horizontal' edge attached, four struts get the remaining four verticals and four remain empty.

Step 2: The bottom corner

The struts with only vertical tendons end up in the bottom of the model. The struts are connected into a loop on the end with the tendon, so that the knots point to the 'inside' of the loop, the longer end goes away from the loop. (This means that if the struts fold over clockwise, the knot will be clockwise towards the strut as well). I start usually with the opposing corners, so that I can always half the tendon when connecting an additional strut. The elastic is looped around the groove once to secure it in place. 

Step 3: The top corner

The top corner is assembled in the same way - connecting four struts at the end with the vertical (orange) tendons, knots points inside, tendons to the outside. All corner need to fold with the same chirality, ie clockwise or counterclockwise. If you lay the top corner above the bottom corner, the yellow tendons should already point to the strut of the bottom corner it connects to.

Step 4: Connecting top and bottom corners with horizontal tendons

Depending on the length of the struts, and the tightness of fit of the cords and grooves, a lot of slipping and sliding can happen while connecting top and bottom corners. Once we yellow tendons were in place, I took care that the loops didn't get entangled. At this stage, the struts hold each other up, like in the match head trick. 

Step 5: Connecting top and bottom corner with remaining corners

This step unveils the precision of planning and preparing of this process. With a good loop length, the model will start to erect itself, becoming three-dimensional and easing the following steps. The inside-outsideness of the remaining corners is still more of an up-downness when the elastic are connected. The inside of the loops goes along the bottom half of the bottom corner strut, and the top half of the top corner strut. If the struts still fold over un-entangled, the top corner starts pushing up the more corners connect to it. Now it's a good time to check that the free ends of the vertical tendons hang in a decent direction.

 Step 6: Connecting the remaining struts to the tendons

Over and under become more important now, and make life easier at the same time. The remaining struts connect between a bottom and top. Each strut goes under a top corner strut, attaches to the bottom corner tendons on the strut in the same direction as in the top corner. It attaches also the top corner tendon of the top corner strut that runs parallel to the one crossed under. (I wonder if this description makes any sort of sense unless you starting these three-dimensional puzzles yourself).

If all worked fine, the top end of the newly connected strut pull on the top corner and float a bit. 

Step 7: Connecting the top part of the middle corners

A lot of movement will happen now. only eight connections finalise the model. Depending on how much uncontrolled movement happens, the model might fall apart or become lose. Working patiently with a steady hands prevents the frustration that arises from the anticipation of success and the sight of an entangled mess of sticks and strings. Like with the other loop connections, the knot of the tendon need to point in the same direction as the other struts in the loop.

Step 8: Connecting the bottom part of the middle corners

If the cords can slide easily, this step can become tricky. If the tendons and loops are too short, the model might 'fly apart', with too long cord lengths the model will still lay collapsed in a pile. Once the remaining connections are made, I take some time to 'tune' each corner. It's more likely to have some trapezoidal corners instead of nice squared ones. If struts were accidentally 'twisted' during build, they can be turned into the proper direction, so that each corner looks similar (all knots oriented the same way, elastic cords length equally from strut to strut.

Step 9: Test

Now the model can be loaded to collapse. With too long loops, a model might still look like this - well, a bit more chaotic as the elastic string would dangle around somewhere. That happened to me with the very first octahedron I build. I went from corner to corner and looped the elastic several times around each corner, and slowly the structure started 'working'. With sufficient pre-tension the model can be handled and tuned easily, and minor hick-ups during the build process corrected.

Sorry for mixing up the photos - two of the steps show a different octahedron. Anyway, if you happened to notice this error it's about time to start building tensegrities. 


Thursday, 3 March 2011

Triple Y


I used wide bamboo struts as basis for a large tetrahedron, which fills nearly a cubic metre in total. The build posed a variety of challenges, with some set-backs on the way. I diverted from my initial plan to build a tetrahedron with 3 clockwise and 1 anti-clockwise corner, although I know think the way I finished the build could work for this 'deviant' tetra as well.

I drilled three holes at either end of the base struts. The holes are less equidistant than I hoped for, if I reuse the method I need find an easy and precise marking method. The variety in diameter meant as well that pre-calculating tendon lengths made little sense, especially as I used 25% shorter struts for the 'floating struts'.

I knew from my first build using holes for the tendon attachment often ends up very difficult. I need to pull the tendon out for some length to tie a knot, it's no fun to do this when the structure is nearly ready. As I planned to use grooves to attach the smaller struts, I just need to find a way to attach the tendons while minimising the amount of 'final tendons'.

By analysing other tetra models I noticed a way to build first a (very slack) 3-strut tensegrity, and then thread the remaining struts first in upper triangle, then in the vertical tendons. In theory, this works well, yet only the base triangle kept its initial length. The failed build attempts convinced me of the feasibility of this approach, and with another intuitive shortening of most tendons I ended up with a stable structure.

The colours join base triangle and top hexagon, the more vertical tendons shape the letter 'y', hence the name Triple Y. It balances on all corners, yet the design favours the biggest triangle as base. Plucking the tendons produces a range of sounds, and quite unpredictable patterns of movement. The sculpture fills about a cubic metre of space with a triangle, a hexagon, three 'y's and six uniquely shaped bamboo struts.